The first session of the Color Relationships 2 class for Fall 2016 was held on Wednesday, August 31. A group of 10 students met to continue their ongoing study of color, its appearance in the visual world, and how to re-create these phenomena through an understanding of color relationships. In this first session, the class went through a review of Color 1 lessons, a study of films and how they modify other colors, and discussed their first assignment. Please see the full post for class materials, including videos and slide presentations.
Homework assignment
Studies may be completed in paper or Adobe Illustrator. Observe an actual example of transparency, and replicate it with opaque shapes. If possible, show both the observed film and the replica. Exploit this phenomenon!

Class recap – some key ideas
Worksheet and review
 Class began with a hands-on exercise that asked students to recreate concepts and color deception exercises from Color Relationships 1 (2016, 2015), and introduced today’s phenomenon, films, by challenging students to create convincing illusions of transparency using only the colored chips contained in their envelope. Dick also provided strips of actual transparencies, in magenta and yellow, so that students could observe the effects of a film and note their characteristics as they covered other colors.
The task of creating a convincing transparency was challenging, both in finding the right color chips, and that many students found it particularly hard to create an effective solution using the chips as they were (i.e., all the same shape and size). As Dick began his post-worksheet slide presentation, he posed a simple question: “How do you take something opaque and make it appear to be transparent?” During the discussion that followed, Dick stressed the importance of using arrays, paying attention to composition, and how to tell a true film from a false film.
Slide show: color relationships, Gestalt, and film characteristics
The most important concept in the whole of the Color Relationships course is RELATIONSHIP. As Dick likes to say, “This course is all about relationships. In life you don’t have anything that is not in relation to something else, and especially when it comes to color, it’s all about relationship.” When talking about arrays, and why they were a breakthrough discovery for Dick, he said, “Once you have an array, you have family relationship. And once you have family relationship, all the magic begins to happen.”
Along with color relationship, another aspect that contributes to creating a convincing optical illusion is the COMPOSITION of a piece. There are many ways to communicate with other people, but in visual art we have to use visual ‘language’, and thus our choices around line, shape, size, and placement become paramount. This was illustrated in some of the slides, and Dick had this to say about good Gestalt vs. poor Gestalt:
In art we have to take into consideration the [whole composition], the Gestalt. This is what Albers meant when he talked about ‘1+1=3’, that the result is more than just the sum of its individual parts … It’s in the way that you have designed it that the magic begins to happen.
You are asking people to ‘re-cognate’, to recognize, [what it is you’re trying to tell them] … and when you have a good Gestalt, the viewer knows exactly what you want them to see.
The last portion of the presentation focused on FILMS: how they modify other colors, and why they are useful for artists. Here are some highlights from the discussion:
- How does a film change the colors it goes over? It will always darken other colors. It will also allow some of the hue and value of the colors it is covering to show through (films are transparent).
- Watch out for false transparencies: films will never lighten colors underneath them, and will modify colors equally (“This is to this, as that is to that”, see Transposition assignment examples).
- Where do you see films in nature? OBSERVE and discover them in action.
- Why use films? Reflect and consider why you might use them in your work.
Examples from Josef Albers’ book, Interaction of Color
Dick also took time to show examples of this assignment that are printed in the Albers book Interaction of Color. Unfortunately, most of the examples are wrong, and show false transparencies. Dick chalks this up to not observing how films behave in real life, and thus most students were guessing at which colors and values to use in their work. Karen summed it up well in her post from the Color 2, Winter 2015 class:
Looking back at his experience in Josef Albers’ color class at Yale, Dick recognizes that they never observed real films to see how they behave. Thus, many of the transparency illusions in the book are impossible – “freaks”. Several ignore the background – the “film” only influences another color, but not the ground that both are laid on. Some show the overlap area as a blend of the two colors (figure and film). These are incorrect “false films” because the value of the overlap area lies between the two colors, rather than showing how the film color darkens the other color.


Watercolor demo: adding a film to create the illusion of a shadow
For the end of class, Dick had prepared a watercolor scene of a simple box on a striped background, which he used to give a demonstration of how a film gives the illusion of a shadow when applied correctly. By applying a thin black wash to the sides and at an angle below the box, the illusion of a three-dimensional box with a strong light source was immediately recognizable. As Dick pointed out, the black wash modified all the colors equally, and the transparency of the wash allowed the colors underneath to still be seen.


Class photos
Will be posted next week!
Class materials
PowerPoint presentation on films


Videos
Tutorial: Creating the illusion of a film
Red & Blue are not primary colors
Same class, different year
For additional background material, and a slightly different approach, we highly recommend reviewing the corresponding class posts from 2015 and 2013.
Additional / supplementary materials
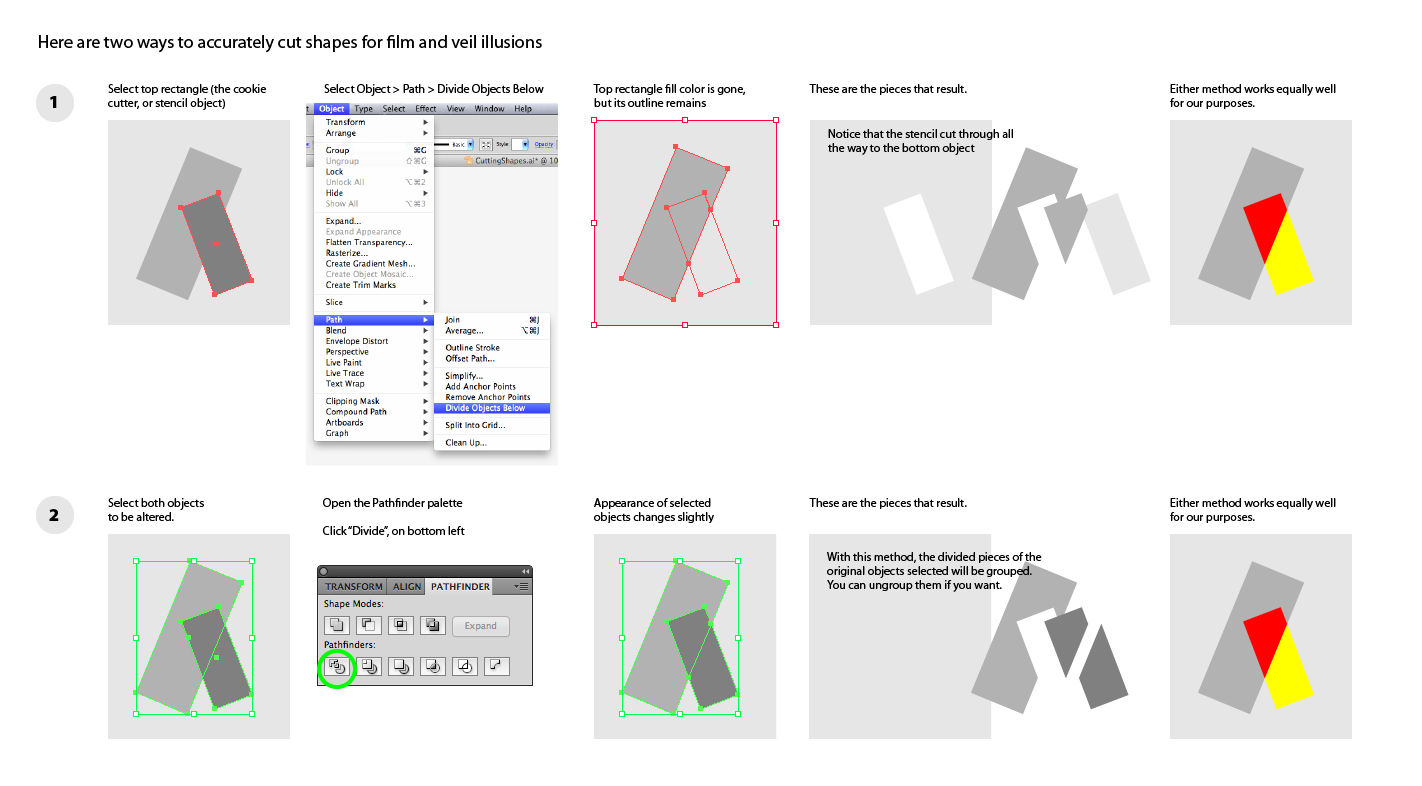
Tips for cutting shapes in Illustrator
See also this post from Dick’s site, Valerie’s stepping stones, which shows Valérie Richter’s year-long color explorations in watercolor. Watercolors act as films, and you can see many examples in her images.


